
Working Towards “Cow Face Pose” Arms Rear Hand Clasp
Working Towards “Cow Face Pose” Arms or “Rear Hand Clasp”

Being able to reach both hands behind your back and touch or clasp your fingertips is a challenging goal lots of people like to work towards. This type of flexibility can be helpful for yogis who like to work on funky arm binds (it’s the same position used in Gomukhasana or Cow Face Pose, but the flexibility can translate to other arm binds as well), for aerialists and pole dancers who need funk shoulder rotation and behind-the-back reaches to grab their apparatus, and for regular Average Joe folks who want enough shoulder mobility to scratch an itch on their back. Personally, I find having a big range of motion in this pose helpful because it allows my to put sunscreen on my own back without needing anyone else’s help (maybe not a primary motivation for most people, but certainly a plus in my book!).
While it may not be as “sexy” as a flat split, it’s a great measurement of shoulder mobility because it requires each shoulder to use a variety of different ranges of motion / actions simultaneously. And it’s not uncommon for students to be able to get the hands closer on one side, but not the other, indicating that they have uneven shoulder flexibility in each side (which might be beneficial to try to even out).
Why Is This Pose So Dang Hard?
Thinking of this pose “just” as reaching your hands behind your back is a simplification in the extreme. There’s actually quite a bit going on, which is why many students find it so challenging!

The top arm is using a combination of shoulder flexion (reaching the arm forward and overhead), abduction (reaching the arm out to the side and overhead), and external rotation (twisting the bicep and upper arm to the outside). And even the “simple” act of shoulder flexion can be further broken down into some serious shoulder movement coordination, because the scapula (shoulder blade) needs to elevate (shrug up towards the ears), rotate (angle outer top corner of the shoulder blade up to shoot the upper arm bone farther overhead), and even possibly protract (slide forwards to hug the side of the ribs) if the arm is reaching forwards and overhead instead of out to the side and overhead. This requires flexible pecs and lats to allow the arm to reach overhead, as well as flexible triceps to deeply bend the top elbow to reach the hand down. It also requires strong rotator cuff muscles to help keep the ball-and-socket joint of the shoulder nice and stable while the upper arm is twisting and reaching backwards.
The bottom arm is using a combination of shoulder extension (reaching the arm backwards), adduction (reaching the arm toward the midline) and internal rotation (twisting the biceps inwards so the hand can reach farther behind you). This requires flexible front and middle delts to allow the arm to reach backwards, and flexy triceps to deeply bend the elbow to reach the hand up the back. And like the top arm, the bottom arm also requires strong rotator cuff muscles to help with the twisting of the shoulder and helping keep the ball-and-socket joint nice and snug and safe in this movement.
A deep dive into the rotator cuff muscles is outside the scope of this blog post, but it’s helpful to understand that different rotator cuff muscles need to engage (and others stretch!) to twist the upper arm one way vs. the other - that means you should work on BOTH your shoulder “internal rotation” and “external rotation” because different muscles can help/hinder those actions.
Recommended Shoulder Stretches/Drills
I’ve grouped the stretches below into whether they work more on improving the reach in the top arm, or the lower arm, so if you have one arm that’s trickier on one side you can spend a little extra time working on the drills that help with that particular range of motion.
Two notes about safety in these (and frankly any, for that matter) shoulder stretches - the two sensations you should not push through:
Tingling or numbness in the hand/fingers (likely this means you’re accidentally pinching a nerve - no good!)
Hard pinching at the top of the shoulder (this often means the top of the upper arm bone is sliding to smoosh into part of your shoulder blade, and bone-on-bone collisions aren’t something you can or should continue to stretch through)
If you get either of those sensations, come on out of the stretch, and try the stretch again in a smaller range of motion - as far as you can go without feeling those sensations (even if that doesn’t feel like much of a stretch). Most likely you’ll be able to go deeper over time as your rotator cuff muscles get stronger at supporting your upper arm and shoulder in these funky positions. Or if you’re looking to help troubleshoot this problem, you could always work with a coach who can help you identify the underlying issue and give you drills that will help make these stretches feel more comfortable!
For the Top Arm…
1. Butcher Block Stretch
This is a nice passive stretch for the lats while the shoulders are held in external rotation by the hands and the chair. You can choose to do this pose with a slight backbend, or remove the backbend and isolate it just in the shoulders for an extra challenge!

Start kneeling in front of a low chair or bench. Bend your elbows and place them shoulder-width apart on your support prop, with hands together, fingers pointing up towards the ceiling
Waddle your knees backwards and drop your chest towards the floor until you feel a shoulder stretch, ideally in your lats (outer armpit) or pecs (front of the chest). For extra intensity, tuck your tailbone to flatten or round your lower back, which will encourage more of the “lean” in this pose to come from your upper back and shoulders
Hold for 20-30s while breathing deeply
2. Block Sandwich Lifts
Think of this as a more active version of the butcher block stretch - instead of leaning into the chair to stretch your shoulders, you have to use your delts to pull your elbows higher to find the stretch position. The addition of the blocks help maintain shoulder external rotation throughout.

Start standing/sitting/kneeling, “sandwiching” one yoga block between your elbows, and one between your hands (both blocks on the widest width), with elbows bent 90*
Keeping a neutral spine, and keeping the elbows bent, slowly lift the elbows as high as you can overhead. Do not let the elbows splay out (you will drop your block!), and don’t let the back arch (that will cheat the shoulder stretch). If it feels like you are hitting yourself in the forehead with the elbow block, shrug your shoulders up towards your ears to clear the block overhead (if you have the flexibility)
Slowly lower the elbows back down
Repeat for 8-12 reps
3. Wall Angels
This drill helps strengthen the external rotators of the rotator cuff as the arms are starting to reach overhead - a real challenge! Make sure the only movement in this drill is coming from the arms and the shoulders, and you don’t let your upper back come off the wall.

Start standing or sitting with your back to the wall, with elbows bent 90* and hips, lower back, upper back, back of shoulders, elbows, and backs of hands touching the wall (if you can’t reach your hands to the back of the wall, which requires a formidable amount of shoulder rotation to begin with, check out the block variation explained here)
Keeping everything still touching the wall, slowly slide your elbows and hands up the wall as high as you can with wrists, elbows, or upper back coming off the wall
Once you’ve reached as high as you can (without cheating!), slide your arms back down to the starting position
Repeat for 8-12 reps
Check out the Flexopedia entry for this drill for a more detailed how-to video (including how to modify this for tighter shoulders using blocks!): Wall Angels
For the Bottom Arm…
4. Awkward Sun Tun
This is a passive stretch for the anterior delts (front of the shoulder) to help with shoulder extension (reaching the arm backwards in space). Be careful to keep this stretch comfortable and don’t push too much weight in the shoulders or elbows if it’s feeling too intense.

Start sitting on the floor with knees bent, hands placed behind you about shoulder-width apart on the ground (wider is OK for tighter shoulders), palms flat (fingers can face backwards or out to the side, whichever is more comfortable for your wrists)
Slowly walk your hands backwards or wiggle your but forwards until you start to feel a stretch in the front of your shoulders. If you feel a lot of pressure in your elbows (especially if your elbows hyperextend), slightly bend the elbows and point them backwards in space (elbow points should point backwards, not out to the side)
Hold for 20-30s
Check out the Flexopedia entry for this drill for a how-to video with other modifications if you’re interested: Awkward Sun Tan
5. Diamond Arm Lifts
This active drill works on strengthening both shoulder extension (reaching the arms backwards in space) while maintaining internal rotation.

Start sitting/standing/kneeling with torso upright, elbows bent out to the sides, and either fingertips touching by your low back (if you have flexier shoulders), or holding on to a strap with hands by the sides of your hips (if you have tighter shoulders).
Keeping the elbows bent (don’t let them start to straighten!) and torso lifted, lift your hands, forearms and elbows behind you as high as you can. Make sure only the arms are moving, and your chest doesn’t start to lean forwards.
Hold for a moment then lower back down.
Repeat for 8-12 reps
6. Wall Devils
This is indeed a much more hellish version of the “Wall Angels” above, it works on actively maintaining shoulder internal rotation as the arms are lifting and lowering in space.

Start standing or sitting with your back to the wall, with elbows bent 90* and hips, lower back, upper back, back of shoulders, elbows, and backs of hands touching the wall (if you can’t reach your hands to the back of the wall, which requires a formidable amount of shoulder rotation to begin with, check out the block variation explained here)
Keeping everything still touching the wall, slowly slide your elbows and hands up the wall as high as you can with wrists, elbows, or upper back coming off the wall
Once you’ve reached as high as you can (without cheating!), slide your arms back down to the starting position
Repeat for 8-12 reps
Check out the Flexopedia entry for this drill for a more detailed how-to video (including how to modify this for tighter shoulders using blocks!): Wall Devils
For Both Arms…
7. Tricep Stretch
A nice passive stretch for the triceps in the upper arm
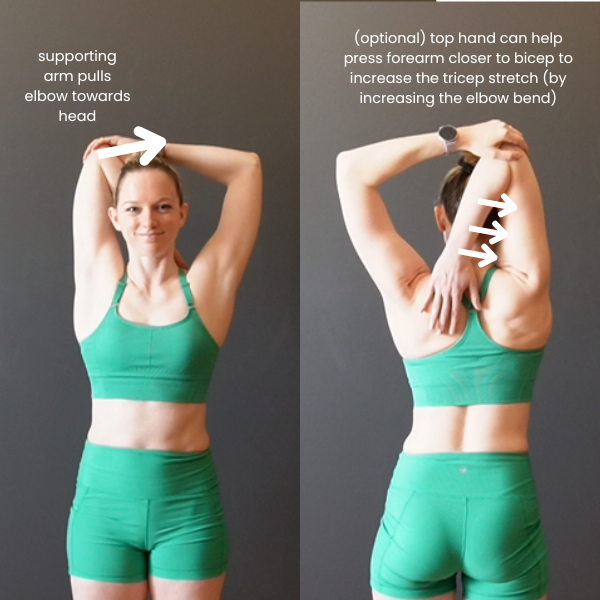
Bend one elbow and reach the elbow overhead
Use the opposite arm’s hand to grab the elbow and gently pull it towards your center line (towards the back of your head). You should feel a stretch in your triceps, the underside of the upper arm
If you’d like to increase the intensity, you can bend the elbow even more, using the “helper” hand to help push the forearm closer to the upper arm to deepen the tricep stretch
Hold for 20-30s, then repeat on the other side
8. Cow Face Pose “Elevator”
This is one of my personal favorites, because it helps work on strengthening our arms and shoulders while in the funky stretched position we use in Cow Face Pose, making it more comfortable over time.

Start standing/sitting/kneeling with torso upright. Holding on to a strap, dangle it down your back, bending your top elbow and reaching your hand as low as you can. Reach the opposite hand up your back to grab the strap
Engaging the upper arm, pull the top hand up towards the ceiling to help pull the bottom hand higher (like it’s riding an elevator up your back). This should feel like a stretch in your bottom arm triceps and/or front of the shoulder. Hold for 10 seconds, then relax
Then engage your lower arm, pulling the strap down using the bottom hand, helping pull the top hand lower down your back (like the top hand is riding an elevator down your back). This should feel like a stretch in the top arm triceps, and/or outer armpit. Hold for 10 seconds, then relax
If you can, walk both hands closer to each other on the strap, and repeat both of those assisted stretches a second time
Check out the Flexopedia entry for this drill for a how-to video with other modifications if you’re interested: Cow Face Pose Elevator
Entrance Variations: Flexion vs. Abduction
Because there is so much going on in our shoulders (ab/adduction, rotation and flexion/extension, oh my!), sometimes focusing on one of those pieces of the movement individually can help some of the supporting muscles better engage before trying to combine everything at once.
Choose one range of motion, and think about just that particular reach first, then let your elbows bend and come into the pose. You might find that emphasizing one particular type of reach/rotation makes this pose feel better in your body!

To emphasize the shoulder abduction/adduction (horizontal reach): reach arms as far out to the sides and eventually across your body as possible, and then let your elbows bend and hands drop to try to bring fingers to touch.
To emphasize the shoulder flexion/extension (forwards/backward reach): reach the top arm to the front and overhead (eventually backwards if you can keep reaching!) as far as you can, and the bottom arm down and back as far as you can. Once you can’t reach any farther, bend the elbows and bring the hands in to try to touch.
To emphasize the shoulder internal/external rotation (twisting of the upper arms): start with elbows out to the side and rotate the “top” arm up-and-back (bicep towards the ceiling), and the “bottom” arm forward-and-down (bicep towards the floor). When you can’t twist either arm any more, bend your elbows and bring the hands in closer together.
Now realistically, we of course use all of these engagements in this pose, but if you find that putting an extra emphasis on one works better for you, that can be a great way to practice!
Looking for More Help?
I just recently published a 20-minute shoulder flexibility training routine that hits all these areas: shoulder flexion, extension, abduction, and internal/external rotation. It even includes additional recommended drills for folks who have a bit more time and want to extend their training session up to a half-hour. These are really some of the best “bang for your buck” type stretches (in my opinion) to help increase your shoulder flexibility across the various different ways
