
5 Drills for Improving Overhead External Shoulder Rotation
5 Drills for Improving Overhead External Shoulder Rotation
Lack of external shoulder rotation - whether it’s for a backbend like a bridge, or a flat back shape like a handstand - can be a limiting factor for both flexibility newbies and aspiring contortionists alike. And this is especially challenging if you also struggle with shoulder flexion (being able to reach your arms straight overhead).
Related Post: The Importance of “External Shoulder Rotation” in a Backbend
Below are some of my favorite drills to help increase your shoulder flexibility in an externally rotated position, but strengthen them to be stronger to support that position. For the purposes of this post, we’ll be focusing specifically on exercises that focus on external rotation when arms are in an overhead position - because that’s the arm/shoulder position we’ll be in in a handstand or a bridge.
Exercises to Strengthen & Stretch Your External Shoulder Rotation
Pre-Test: What’s Your Starting Point?
If you’ve never really worked on your external shoulder rotation before, it’s fun to “test” yourself to see how much of a difference actually warming up and conditioning your shoulders can make in a single session. And over time, you should be able to notice both your pre-test “cold” flexibility and post-test “warm” flexibility improve!
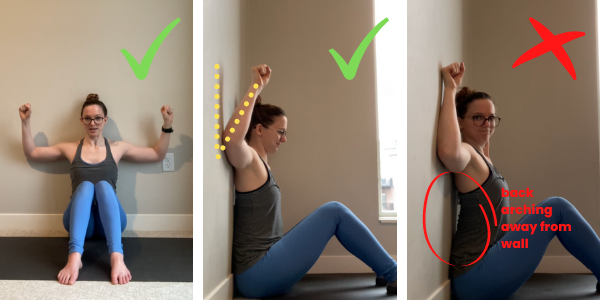
Robot Arms Test
Start sitting with your knees bent, feet on the floor, and back completely flush against the wall (no arching!)
Lift your elbows out to the sides to shoulder height (hands can reach forwards), trying to press your upper arm into the wall
Keeping your entire back and upper arm in contact with the wall, and maintaining a 90 degree bend at the elbow (“robot arm”), start reaching your forearm up and back to the wall - this is our external shoulder rotation
Take a picture of how far you can reach back in this position
Modification for bendy people: If you can get your hand and entire forearm to touch the wall - congratulations you have quite a bit of external rotation to start with! So you’d be better off taking your pre-test photo away from the wall - just make sure you are keeping your back completely flat and elbows in line with your shoulders when you do your robot arm reach.
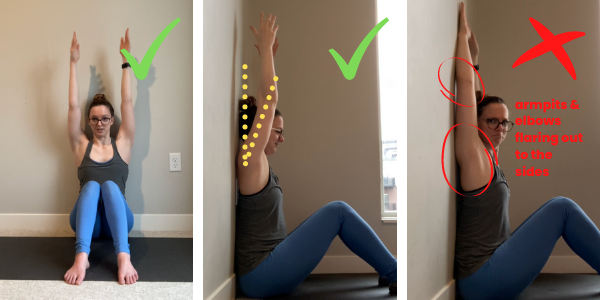
Overhead Reach Test
Start sitting with your back against the wall just like the robot arms test
Reach your arms out forwards, arms straight, hands shoulder width apart, palms facing in toward each other
Keeping your entire back flush against the wall, palms facing in towards each other, and elbow creases facing the wall, reach your arms overhead. Don’t let your arms rotate to splay your elbows to the outside - often times when we get to our comfortable end range it feels like we can reach/push farther by letting our shoulders internally rotate. To ensure your shoulders are still externally rotated, if you bend your elbows they should point forwards
Take a picture of how high you can lift your arms in this position
Modification for bendy people: Just like the robot arm test, you can also do this one away from the wall
Include Mobility Work in Your Warm Up
As always, any “serious” flexibility work should start with some sort of warm up. That means at least 5-10 minutes of something that gets you breathing harder, and some gentle mobilizations of the joints you’ll be working like these shoulder mobilizations.
Personally, some of my favorite shoulder warm ups are robot arms and good ol’ shoulder flossing.
Start with Passive Work
It’s helpful to do some gentle passive stretches on some of the areas that can often hold us back before we dive into our more “intense” active flexibility work. For our overhead external shoulder rotation, that’s often our pecs and lats.
For your chest, one or two of these would be a great starting point.
For your lats, a bent arm puppy pose is great because it encourages our shoulders to stay externally rotated as we find our lat stretch
Optionally, if you like to foam roll, spending a minute or two foam rolling (or peanut-ing) your chest and lats can sometimes help.
Time for the Active Flexibility Work!
1. Serving Cookies
Aside: I’ve heard this drill described many ways before, but the “plate of cookies” I learned from Dr. Su Havens is by far my favorite
Start sitting with your right arm bent 90 degrees, elbow hugging into your side, and palm facing up like you are holding a plate of cookies
Keep that right elbow squeezing in toward your side as you start to reach your right hand back (like you’re passing the plate of cookies to someone next to you).
Don’t let your torso twist/rotate (chest should stay pointing forwards)
Don’t let your elbow float away from your side. I guarantee it’s going to try to! It may help to squeeze a small towel between your elbow and your side to ensure you are maintaining that squeeze as you rotate your shoulder
Float your forearm back to start (hand back in front). That’s one rep
Repeat for 8-12 reps on the right arm, then switch sides
2. Block Sandwich Lifts
Not going to lie, this is my favorite exercise in this whole list - the first time I learned it I felt muscles engaging I didn’t even know existed. If you ONLY do one exercise out of this list, make it this one!
Start in a comfortable seated position with your back flat. Sandwich one yoga block between your elbows, and one block between your hands, with your elbows bent 90 degrees
Keeping your back flat and your elbows bent 90 degrees, slowly lift your elbows, trying to reach your hand block behind your head
Don’t let your back arch - the only joint we want moving is our shoulder (not our spine)
Don’t let your arms straighten - try to keep that 90 degree bend in your elbows, which means thinking about reaching back behind your head with your hand block, not up to the ceiling
Slowly lower your elbows back down - that’s one rep
Repeat for 8-12 reps
This can sometimes be a “humbling” exercise - it looks easy, but if you don’t have a lot of external shoulder rotation this one will be very challenging. It’s better to keep your reps small (just lifting your elbows an inch or two) so you can maintain proper form (no back arching) instead of cranking your arms back and arching your back.
3. Block Wall Slides
Start standing (or kneeling) in front of a wall. Holding a block between your ent elbows and a block between your palms (just like the block sandwich drill above), bring your hands, forearms and elbows onto the wall, with elbows bent around chest height. (It should look a bit like you’re doing a forearm plank standing up).
Keeping your back flat, start to slide your forearms up the wall as far as you can while:
Not letting your back arch (this is the most common “cheat” our body does to make this exercise easier)
Not letting your elbows flare out to the sides (dropping your elbow block)
Not losing your elbow and forearm contact with the wall
Once you’ve slid your arms up as high as you can, slowly slide them back down to start - that’s one rep
Repeat for 8-12 reps
4. Low Cobra “Open Sesames”
Start in a comfortable low cobra position lying on your belly with your forearms on the floor, elbows wherever feels most comfortable
Start with your right elbow bent 90 degrees, planted on the floor in front of the rights side of your chest, and forearm and fist on the floor, with your forearm parallel to the front of your mat. You can move your left arm wherever is comfortable to feel like it’s not in the way
Keeping your right elbow planted on the floor, start to peel your forearm away from the floor, trying to lift the knuckles of your fist all the way up to the ceiling. Your goal is to get your knuckles all the way up “pointing” toward the ceiling
Too challenging? Slide your right elbow back so it’s closer to your chest
Want it to be harder? Reach your elbow farther forwards, and/or place your elbow on a block
Slowly lower your forearm back to the floor - that’s one rep
Repeat for 8-12 reps on the right arm, then switch to the left
BONUS VARIATION: If you want an extra challenge, once you’ve lifted your forearm, try to (briefly) lift your elbow off of the ground by punching up toward the ceiling. Then drop your elbow and close your forearm back to the floor.
5. Puppy Pose Active Press
Start in a puppy pose: from hands and knees, keep your hips stacked on top of your knees (thighs perpendicular to the floor) while you walk your hands forwards with straight arms. Relax your head, armpits and chest towards the floor
Externally rotate your shoulders by wrapping the outsides of your armpits towards the floor - you should feel a stretch in your lats.
Keeping this same position (chest as low as is comfortable, arms straight, armpits hugging toward the floor), engage your arms by pressing your palms into the floor like you’re trying to push the floor away from your face. You don’t need to push so hard that your chest actually moves, try to keep the push at about 50% power, and keep your chest low. Hold this engagement in your arms, chest and shoulders for 10 seconds
Then relax and hold your relaxed puppy pose for another 10-20 seconds
Optional: repeat for 2 more sets of resisting-then-relaxing
Don’t Forget to Work on Your Internal Shoulder Rotation Too
Just like with our hips (another ball and socket joint), just because we want more external rotation doesn’t mean we should completely ignore our internal rotation. Our joints are most stable when we’re maintaining a balance in our training - so we’ll include a couple of exercises for our internal shoulder rotation as well.
My two favorite drills for shoulder internal rotation are diamond arm lifts and the sleeper stretch:
Post-Test: How Are Your Shoulders Now?
Now that you’ve spent a good 10-20 minutes just working on your shoulder external rotation, it’s time to post-test! Repeat the robot arms test and overhead reach test from early and note:
Is there visible progress (can you reach farther back than before)?
If there sensational progress (does the movement feel easier or more comfortable)?
Hopefully you’ll be pleasantly surprised by the amount of difference focusing your conditioning on goal-appropriate exercises can make! But of course for lasting flexibility gains, you’ll need to continue training your shoulder flexibility. Consider repeating this routine 2-3 times a week, and continue taking progress pictures to monitor your progress.
Here’s a Follow-Along Practice Video
Related Content
Recommended On-Demand Workshop

If you liked these drills and want to work on even more shoulder (and upper back) flexibility - particularly helpful if you came to this post looking for help with a bendier bridge - check out my 60-min recorded workshop, Bridge Clinic: Hello Upper Back!, for even more drills to help with your external shoulder rotation, as well as your thoracic extension (arching in your upper back).