Got Tight Calves? 3 Beginner-Friendly Calf Stretches
Got Tight Calves? 3 Beginner-Friendly Calf Stretches
As someone who’s gone through several “do a lot on your toes” hobbies (cross country running, Latin dance, pole dance…), I’ve had tight calves virtually all my life. Thankfully calves typically respond very well to stretching (especially loaded/active stretches), so if you have calves that feel like rocks - there is hope!
Calf Anatomy: What You Need to Know
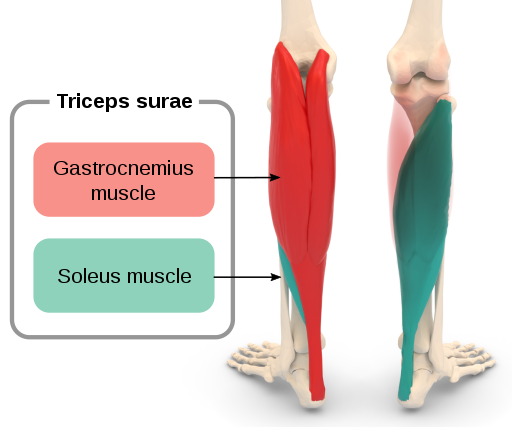
Image Source: Polygon data were generated by Database Center for Life Science (DBCLS)[2], CC BY-SA 2.1 JP, via Wikimedia Commons
The most important thing you need to understand about your calf muscles to be able to properly give them a good stretch is that your calves consist of two muscles:
The gastrocnemius is the outer-most muscle (the one you can see popping out of bodybuilders’ legs). It has two “heads” (one on each side of the bottom of the femur/thigh bone) and it crosses the knee joint and ankle joint. To give the gastrocnemius the deepest stretch, you need to straighten your knee and (dorsi)flex your ankle.
The soleus lies superficial (underneath) the gastrocnemius and does not cross the knee joint. While you can still stretch your soleus with straight-legged stretches, a better way to target it is to bend your knee to ensure you’re just stretching the soleus, and not the gastrocnemius too.
Stretch It Out: 3 Calf Stretches for Beginners
1. Elevated Heel Raises
This is my favorite calf stretch to start with because it’s an active flexibility exercise: you let your calves lengthen (stretch!) as you drop your heels to the floor, and then once they’re in the most-lengthened position, contract them to push your heels back up to the ceiling.
Start with the ball of your right foot on an elevated surface (like an aerobics step, yoga block, or the edge of a stair), with your heel hanging off in space, and hands on the wall, chair, or pole for balance. Keep your right leg straight for this exercise
“Easier” version: Rest your left foot/toes on the floor or step to support some of your weight, and help with balance
“Harder” version: Keep your left foot lifted in the air (I like crossing it behind my right calf)
Keeping your right leg straight, drop your right heel toward the ground to feel a calf stretch (depending on your flexibility and the height of your support surface, your heel may or may not touch the ground - both are fine)
Press into the ball of your right foot to lift your heel and come up onto your toes. That’s one rep. Repeat for 8-15 reps on the right leg, then switch to the left
2. Straight Leg High Lunge
This is a nice passive stretch to follow up at the wall (or your pole) after burning up your calves with that first heel raises exercise.
Start facing a wall (or pole or chair). Pressing your hands into the wall for balance, take a big step back with your right foot, keeping your leg straight, heel lifted and toes pointing toward the wall
Start to press your heel toward the floor until you feel a calf stretch. If you don’t feel much of a stretch, step the right foot farther back
Hold the stretch for 15-30 seconds, then switch legs
Variation: Add Some Slight Rotation - since your gastrocnemius has two heads, we can give each side of the muscle a slightly deeper stretch by adjusting our foot position/rotation. When we keep our toes pointing straight forward, both sides of the muscle are stretched fairly evenly. Slightly internally rotating the leg and toes (heel reaches slightly to the outside) can give the inside of the calf a bit more of a stretch, and slightly externally rotating the leg/toes (toes to the outside, like in a Warrior pose) can stretch the outside of your calves a bit more.
3. Bent Knee High Lunge
This is a variation of the stretch above that better targets the soleus. By bending our knee, we take some of the stretch out of the gastrocnemius so we can focus more on the soleus underneath.
Start in your straight leg high lunge stretch (see above)
Bend your straight leg, but keep trying to reach that heel toward the floor
Hold the stretch for 15-30 seconds, then switch legs
(I would not recommend adding any rotation to this stretch - it’s not necessary, and it can put some funky pressure on the knees. So keep the toes pointing towards the wall.)
Additional Stretches to Consider
There are two other stretches that are great for the calves, but I intentionally didn’t include them because they require more hamstring flexibility (so much, frankly, I don’t consider them in the “beginner friendly” range). IF you have more flexible hamstrings - specifically, if you can sit in a pike stretch with your butt on the floor and back totally flat - then these two would be great to add. But if your hips are on the tighter side, stick to the standing stretches listed above (and if you want to work on those tight hamstrings, I’ve got a blog post on that too!).
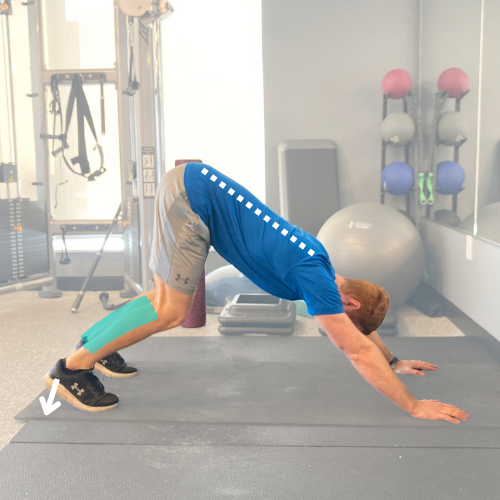
Downward Facing Dog
Feel free to do downward dog with knees bent or straight (or “walk it out” and bend one knee, then the other, a couple of times). Be sure to keep your back flat (particularly your low back)
Seated Calf Stretch with Strap
I told Nate to smile for this photo because the original face showed quite the grimace - so be warned this one can give you some pretty strong feels!
A Quick Note on Foam Rolling
Many people find doing some gentle foam rolling either before stretching, or in between some of the stretches, helpful to encourage their calves to relax. Especially if you’re someone who has hard time “feeling” a stretch in the calves, try giving rolling a try before stretching next time.
I recommend a foam roller over a more-targeted mobility prop like a lacrosse ball or peanut because it applies pressure over a greater surface area, which keeps the sensation less intense (and more manageable). Rolling should not hurt - if rolling feels so intense it’s making you grimace, trying to “push through the pain” is just counterproductive. Instead lay a folded towel on the roller to add some more cushion, or support your body weight in your arms and non-leg-being-rolled leg to take some weight/pressure out of the rolling leg.
You can either spend a minute or two slowly rolling your calves up and down the roller (I like doing one leg at a time to more easily control the pressure), angling your leg to roll up and down the middle of the calves, the outside edge, and the inside edge. OR you can try and find a “sticky” spot with the roller, roll a couple of times to try to find a spot that has some extra tightness, and then hold gentle pressure on that challenge area. If you want to work it even more, your can point and flex your foot (adding a calf contraction and slight stretch) while leaning that tense part of your calf into the roller.


