
How to Flatten Your Middle Splits
How to Flatten Your Middle Splits

Image credit: u/rlhignett (reddit)
Just like with front splits, the last couple of inches in your middle splits can feel like the most challenging to train. If you feel like you’ve hit a plateau and are “stuck” in your middle split training, it’s time to re-assess your routine.
Firstly, I’d suggest making sure you’re following the usual “best practices” for flexibility training (ex. not stretching the same muscle group two days in a row, make sure you’re including active flexibility work, make sure you’re stretching with proper form, etc).
But for more detailed suggestions - read on for my biggest tips for flattening your middle splits.
1. Work On Active Flexibility for Both Your Adductors and Your Glutes
If you’re not already doing any active work for your middle splits - definitely start there! But odds are you’re already doing some to have gotten your middle splits close to flat.
My question to you is are you training both sides of the hip joint equally? When it comes to middle splits, that means:
Strengthening our inner thighs (adductors) while they’re in a lengthened position (and while in hip flexion)
Strengthening our glutes (abductors) while they’re in a shortened position (and while in hip flexion)
If you’re only doing work that is strengthening muscles on one side of your joint, then you’re missing out!
Here are some of my go-to drills for these muscle groups:

Middle Split Inner Thigh Strengthening

2. Strengthen Your Hip Internal & External Rotators
Sometimes when the smaller stabilizer muscles are weak (in our hips, that’s often the muscles that help with internal and external hip rotation), our body won't feel safe extending our larger “mover” muscles (like our bigger inner thigh muscles) to their end range of motion because it doesn’t feel safe/stable in the hip joint. These are a good batch of drills that work hip rotation. I like doing hip rotation training as part of my warm-up and conditioning before I shift my focus to the larger muscle groups (glutes and inner thighs) so I can be confident those muscles will be firing appropriately to support bigger, more challenging, movements.
3. Start Working on Oversplits (If Appropriate)
Note: oversplits are a relatively advanced exercise, and only recommended for students who:
Are very close to flat (hips 1-2 inches away from the floor - that might mean knees are already touching the ground)
Have zero knee discomfort when practicing full middle splits
Personally I find oversplits for middle splits 1000x harder than oversplits for front splits, but middle splits in general have always been more challenging for me!
If you’ve never done oversplit work in your middle splits, I suggest starting with working in a half frogger / half middle split first (essentially only doing the oversplit on one leg at a time).
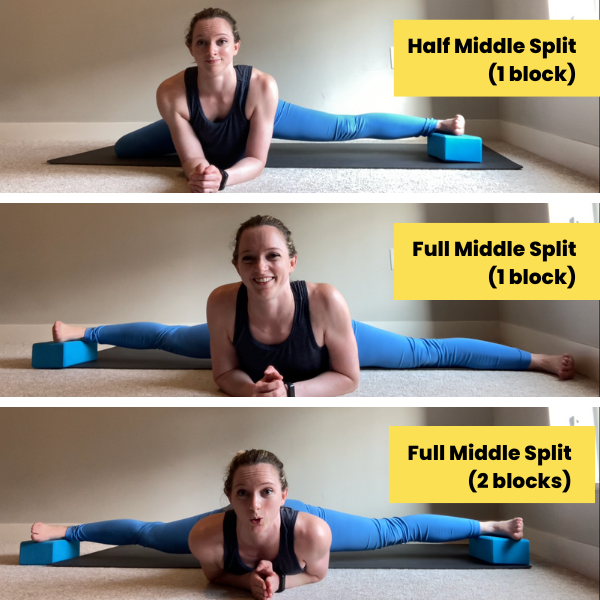
Start in a half frogger (aka half middle split) stretch - one knee bent 90 degrees, the other leg kicked out straight, with the knee and toes pointing forwards
Once you’ve found your deepest half-frogger stretch, add a yoga block under your straight-leg foot (keeping the foot flexed, as opposed to pointed, will make this more comfortable on your ankle)
Hold this stretch for 30-60 seconds, then remove the block and relax in your "regular" (no block) half middle split - you may be surprised to see it may feel more comfortable!
Repeat on the other leg
You can also incorporate the block-elevated oversplit to some of the strengthening drills suggested above, such as doing contract-relax for your inner thighs and/or glutes while in a half frogger oversplit.
If adding a block to your half frogger feels good, you can then try to add a single block to your full middle splits, and then eventually work up to doing blocks under both legs in your middle split!
4. Incorporate Gentle Movement Into Your Stretches
This is one thing that made a big difference in my own training - but I know “wiggling” while you stretch doesn’t work for everyone’s body, so feel free to totally disregard this advice if it doesn’t work for you.
The theory behind the benefit of adding some gentle movement to our stretches, like rocking your hips forward and backward (just an inch in each direction, nothing huge) in your frogger, half frogger, or full middle split, is twofold:
You're literally changing the position of your pelvis in relation to your femur and tibia (the leg bones to which our inner thigh muscles attach), which causes them to be stretched at slightly different angles than the typical “neutral” hip position stretch
You're helping teach your body that you have the strength and control to move even while some of your muscles are at their end range position, meaning your muscles are firing to support this movement and getting a bit stronger. Putting it another way, you’re teaching your body "This position is totally safe, look how we can move and wiggle here comfortable! We didn't just accidentally fall into this middle split and get stuck.”
For middle splits (and/or straddles), these can be helpful types of movements to add - so long as they feel comfortable. There is a chance that some movements (particularly anything that tilts the pelvis) can lead to bone-on-bone hard blockages, which we never want to push through! So stick with movements that feel “easy,” and don’t worry about making them big - bigger isn’t necessarily better.
Some movement examples to try:

side to side reaches

hip rocks (forward and backward)

pelvic tilts (tuck and tilt)
If these movements feel good adding to your “standard” stretches - then you can try adding them to your oversplit work!
